|
The pictorials are illustrated with spaces between beads for a clearer direction, in the actual beading, there should be no spaces.
|
Beaded Christmas Tree :
Go back to page 1 of the tutorial!
Always Remember to pull tight on EVERY STEP.
|

|
|
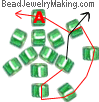
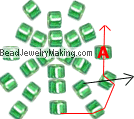
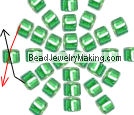
| Step 16: |
After finishing two layer (bottom and middle layer), use the smallest bead 0.8mm to make the final top cone..
- Cut a piece of beading wire around half meter long.
- Add three beads at the middle of the string and crisscross the other end of the string through the last bead added - shown where both arrows are coming out from.
|
|
 |
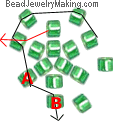
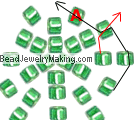
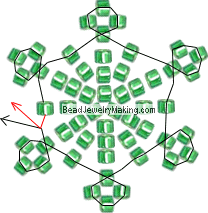
| Step 17: |
- Continue to:
Add three beads on the right (black) string, crisscross the left (red) string through the last bead added.
Continue to pass the black string (the one you just used to added new beads on) through one old bead from step 16 marked with
A.
|
|

|
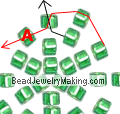
| Step 18: |
- Continue to:
Add two beads on the top (red) string and crisscross the other end of the string through the last bead added.
Continue to pass the red string (the one you just used to added new beads on) through two old beads from step 17 and 18 marked with A
and B.
|
|
 |
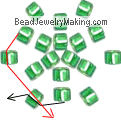
| Step 19: |
- Continue to:
Add one bead to crisscross both string through, shown where both arrows are coming out from.
|
|
 |
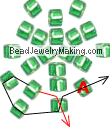
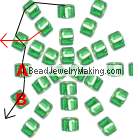
| Step 20: |
- Continue to:
Add four beads on the bottom (red) string and crisscross the other end of the string through the last bead added.
Continue to pass the red string (the one you just used to added new beads on) through one old bead from step 17 marked with A.
|
|
 |
| Step 21: |
- Continue to:
Add three beads on the right (black) string, crisscross the left (red) string through the last bead added.
Continue to pass the black string (the one you just used to added new beads on) through one old beads from step 18 and 20 marked with A
and B.
|
|
 |
| Step 22: |
- Continue to:
Add two beads on the top (red) string and crisscross the other string (black) through the last bead added - shown where both arrows are coming out from.
|
|
 |
| Step 23: |
- Continue to:
Add three beads on the left (black) string, crisscross the right (red) string through the last bead added.
Continue to pass the black string (the one you just used to added new beads on) through one old bead from step 20 marked with
A.
|
|
 |
| Step 24: |
- Continue to:
Add two beads on the bottom (red) string and crisscross the other end of the string through the last bead added.
Continue to pass the red string (the one you just used to added new beads on) through one old bead from step 20 marked with A.
|
|
 |
| Step 25: |
- Continue to:
Add two beads on the bottom (black) string, crisscross the top (red) string through the last bead added.
Continue to pass the black string (the one you just used to added new beads on) through one old bead from step 21 marked with
A.
|
|
 |
| Step 26: |
- Continue to:
Add two beads on the right (red) string and crisscross the other end of the string through the last bead added.
Continue to pass the red string (the one you just used to added new beads on) through one old bead from step 21 marked with A.
|
|
 |
| Step 27: |
- Continue to:
Add two beads on the right (black) string, crisscross the left (red) string through the last bead added.
Continue to pass the black string (the one you just used to added new beads on) through two old beads from step 22 and 23 marked with A and B.
|
|
 |
| Step 28: |
- Continue to:
Add one bead to crisscross both strings through - shown where both arrows are coming out from.
|
|
 |
| Step 29: |
- Continue to:
Make the skirting just like the previous two layer of cones you made and tie off.
|
|
|
|
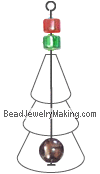
| Step 30: |
- Putting the Christmas tree charm together:
Take the long eye pin, insert the 4mm bead, add on the first cone you made, followed by the second cone and finally the last cone you made.
Stack them tightly, add one green bead and one red bead>
Cut away excess eye pin leaving only around 1cm sticking out.
Using round head pliers, curl the tip of this pin into a circle.
|
|
 |