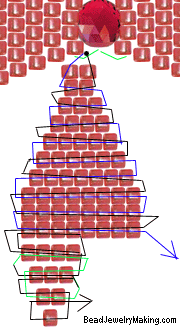
| Step 3: |
The ribbon tail: Cut a new piece of wire, starting point is marked with a black dot.
Pass this wire through the wire from previous beading of the ribbon shown below the crystal with green line.
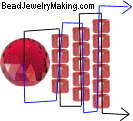
Add one bead on each side of the wire, add two more on one side and crisscross the other end though this two beads.
Continue by adding:
3 beads - crisscross - pull tight,
4 beads - crisscross - pull tight,
5 beads - crisscross - pull tight,
6 beads - crisscross - pull tight,
7 beads - crisscross - pull tight,
8 beads - crisscross - pull tight,
8 beads - crisscross - pull tight,
8 beads - crisscross - pull tight,
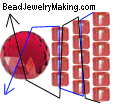
Now the tail part:
work on one side of the tail first, taking the left wire, add on 4 beads, string it back through the 4 beads on top (from the 8 beads row above) looping it back through the new added 4 beads again.
Add 3 beads, loop the wire back through the 4 beads added before this, loop through the new added 3 beads again.
Add 2 beads, loop the wire back through the 3 beads added before this, loop through the new added 2 beads again.
Add 1 bead, loop the wire back through the 2 beads added before this, now you can try looping the wire all the way back up the 3, 4, 5 (you do not need to tie off, as it is already secured by all the looping back, just cut away the excess wire)
Repeat this on the other side of the tail (the right wire)
Repeat this step 3 with a new piece of wire on the other side of the ribbon tail.
For adding on the brooch pin on the back, refer to the last step of dragonfly brooch instruction.
|