bead jewelry making - beaded flower making

December 2005 Beaded Dog

You can find a variety of Free Arts and Craft Project here, including beaded project and other project.  This month's project is a beaded dog.

The pictorials are illustrated with spaces between beads for a clearer direction, in the actual beading, there should be no spaces.

Beaded Dog :

What you need:

1)    Beads, Pearls or Crystals 3mm and larger. 3 black, 1 colorful, 111 white 
2)    Beading string - nylon or wire (25mm)


Click to see bigger picture

Step 1: I'll go faster on this one, if you have never done this stitch before, please refer to: Right Angle Weave instruction.

Top of the head and ears:The red dot is the starting point.
Add one pearl in the center of the string (make sure you balance out both end)
Add 7 pearls on one side of the string, cross the same string back the last 4th pearls added and then cross through the first pearl added (not the center pearl)
Repeat this for the other side of the string.
Step 2: Head and Body:Add one pearl on each side and one more to crisscross both side of the string (refer to the right angel weave instruction link on step 1 if in doubt)
continue adding such squares until you reached the fifth square.
Add one peals on each side of the string and add one red color crystal or bead for the dog's collar.
Continue to make two more squares.
Add one black crystal on each end of the string and crisscross both ends back through the pearl on top of the head (from step 1)
Step 3: Now you are looking at the side view of what you have done.
Loop the string in to the position at the start of one ear or you can always start with a new string.

Loop the string back, one end through the black crystal and the other through the exact opposite pearl. Add one pearl, crisscross both side of the string though this.
Loop the strings back through the next pearls (upwards) like what you have just done, add one pearl, crisscross both side of the string through this pearl.
Repeat this until you have reached the top (represented by the lighter color - on top) loop the strings as if you are strengthening the peals.

Continue to loop back and add pearls like what you just did on this step 3 for the other side and you will end up back at the other black crystal.
Step 4: The nose: Loop the strings back to the position under the eyes.
Add one pearl on each side of the string, add a black crystal for the nose, crisscross both string through this crystal.
Add another pearl on each side of the string, crisscross both string back through the pearl just above the red crystal.  You can now tie and cut off access.
Step 5: The Body: with the face of the dog facing away from you.

Use a new string, pass it through the second last row of the pearls on the lower part of the body as shown where the blue and black lines join.
Start adding pearls and making the usual squares that you should be familiar with now.
Make 4 squares, followed by adding one peals on each side of the string and passing it back to the bottom of the body you made on step 3. (shown by red and green line) 
Step 6: Now you place the dog's facing down on the table.
Loop the strings back to the pearl on the side of the body you did on step 5.
Loop the strings through the side pearls (upwards)
Add one peal and loop it back through the pearls on the side and upwards.
Loop further until you reached the other side and repeat this adding one pearl step.
Step 7: Legs: Have the dog face to your right.
Loop the string back through and emerge from the pearl (where the blue and black line meet)
add two squares, followed by one pearl on each side of the string and crisscross both string back through the same pearl where you started on this step (shown by the red and green line).

Now that you have one leg, repeat and make 4 legs at all four corners.
And one tail using the same method (you should not have any problem finding where to add the tail)

More projects to be found in the below categories:


Other Project Adult Project Flower Project Jewelry Project
Kid Art Project Bead Project Ring and Bracelet Project
Check out our Bead Project page or  Photo Gallery for more Ideas

Disclaimer: The information in each project is submitted by our users and presented in good faith, but no warranty is given, nor results guaranteed, nor is freedom from any patent to be inferred. Since we have no control over physical conditions surrounding the application of information herein contained, BeadJewelryMaking.com disclaims any liability for untoward results or content. 
Important: Please be sure to thoroughly read the instructions for all products, paying particular attention to all cautions and warnings shown to ensure the proper and safe use of the product for child safety in accordance to age safety standards. 
Copyright: Users voluntarily submits their own content and the copyright belongs to the user themselves, but by submitting any and all information to BeadJewelryMaking.com users agrees that these information can be evaluated, use or not to use and amended by BeadJewelryMaking.com.
All Rights Reserved. No part of this Project may be reproduced in any form without permission in writing, except for your personal use, except by reviewer, who may in reviewing this project, quote brief passages in a magazine or newspaper. The viewer is granted a limited, non-transferable one-time license to print one copy of each printable page for personal use without specific permission. Further copying, distribution or use of any of the material herein, including without limitation printable pages, is prohibited.
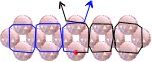
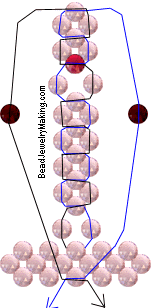
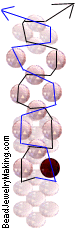
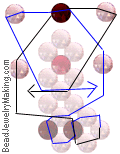
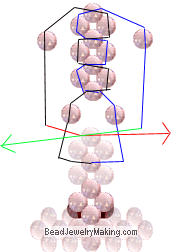
Photo Gallery | Bead Project | Arts and Craft Idea | Kid Art Project | Beaded Flower | Beaded Jewelry | Links | About Us | Contact us | Terms of UseSitemap
 � beadjewelrymaking.com. Design by Login Comtech

Google
 
Web beadjewelrymaking.com