|
|
The pictorials are illustrated with spaces between beads for a clearer direction, in the actual beading, there should be no spaces.
|
Beaded 3-D Bon Bon Sweet :
What you need:
1) Glass seed beads and short bugles size 11/0
2) Beading string (0.25mm)
Always Remember to pull tight on EVERY STEP.
|

|
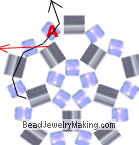
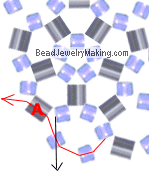
| Step 1: |
- Cut a piece of beading string around 1/2 meter long.
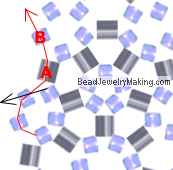
- Add five seed beads at the exact center of the string.
Crisscross the other end of the string through the last bead added (shown where the two arrows crisscrosses and comes out from).
|
|
 |
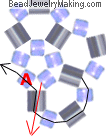
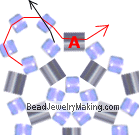
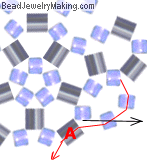
| Step 2: |
- Continue to:
Add one bugle, one seed bead, one bugle, one seed bead and one last bugle on the left (black) string, crisscross the right (red) string through the last bead added (shown where the red arrow is coming out from). Continue to pass the black string (the one you used to add new beads on) down through the seed bead from step 1 marked A.
|
|
|
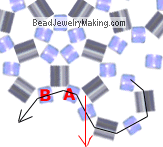
| Step 3: |
- Continue to:
Add one seed bead, one bugle, one seed bead and one last bugle on the top (red) string, crisscross the bottom (black) string through the last added bead. Continue to pass the red string (the one you just used to add new beads on) through the bead from step 1 (marked with A).
|
|
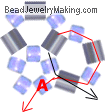 |
| Step 4: |
- Continue to:
Add one seed bead, one bugle, one seed bead and one last bugle on the right (black) string, crisscross the left (red) string through the last added bead. (shown where the red arrow is coming out from). Continue to pass the black string (the one you just used to add new beads on) through the left bead from step 1 (marked with A).
|
|
 |
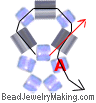
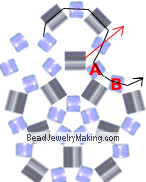
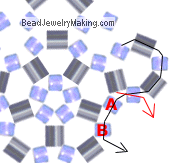
| Step 5: |
- Continue to:
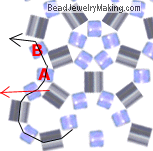
Add one seed bead, one bugle, one seed bead and one last bugle on the bottom right (red) string, crisscross the top left (black) string through the last added bead. Continue to pass the red string (the one you just used to add new beads on) through the two beads from step 1 and 2. (marked with A
and B).
|
|
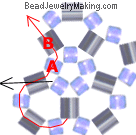 |
| Step 6: |
- Continue to:
Add one seed bead, one bugle and one seed bead on the bottom (black) string, crisscross the top (red) string through the last added bead (shown where the red arrow is coming out from). Continue to pass the black string (the one you just used to add new beads on) through the left bead from step 2 (marked with A).
|
|
 |
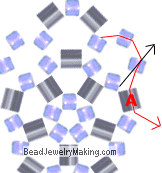
| Step 7: |
- Continue to:
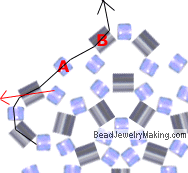
Add three seed beads on the bottom left (red) string, crisscross the top right (black) string through the last added bead. Continue to pass the red string (the one you just used to add new beads on) through the one bugle bead from step 2. (marked with A).
|
|
 |
| Step 8: |
- Continue to:
Add one bugle, one seed bead, one bugle and one last seed bead on the left (black) string, crisscross the right (red) string through the last added bead. Continue to pass the black string (the one you just used to add new beads on) through the two beads from step 2 and 3. (marked with A
and B).
|
|
 |
| Step 9: |
- Continue to:
Add two seed beads on the top (red) string, crisscross the bottom (black) string through the last added bead. Continue to pass the red string (the one you just used to add new beads on) through the one bugle from step 3. (marked with A).
|
|
 |
| Step 10: |
- Continue to:
Add one bugle, one seed bead, one bugle and one last seed bead on the top (black) string, crisscross the bottom (red) string through the last added bead. Continue to pass the black string (the one you just used to add new beads on) through the two beads from step 3 and 4. (marked with A
and B).
|
|
 |
| Step 11: |
- Continue to:
Add two seed beads on the top right (red) string, crisscross the bottom left (black) string through the last added bead. Continue to pass the red string (the one you just used to add new beads on) through the one bugle from step 4. (marked with A).
|
|
 |
| Step 12: |
- Continue to:
Add one bugle, one seed bead, one bugle and one last seed bead on the right (black) string, crisscross the left (red) string through the last added bead. Continue to pass the black string (the one you just used to add new beads on) through the two beads from step 4 and 5. (marked with A
and B).
|
|
 |
| Step 13: |
- Continue to:
Add two seed beads on the right (red) string, crisscross the left (black) string through the last added bead. Continue to pass the red string (the one you just used to add new beads on) through the one bugle from step 5. (marked with A).
|
|
 |
| Step 14: |
- Continue to:
Add one bugle, one seed bead, one bugle and one last seed bead on the bottom (black) string, crisscross the top (red) string through the last added bead. Continue to pass the black string (the one you just used to add new beads on) through the two beads from step 5 and 6. (marked with A
and B).
|
|
 |
| Step 15: |
- Continue to:
Add two seed beads on the bottom (red) string, crisscross the top (black) string through the last added bead. Continue to pass the red string (the one you just used to add new beads on) through the two beads from step 6 and 7. (marked with A
and B).
|
|
 |
| Step 16: |
- Continue to:
Add one bugle, one seed bead and one last bugle bead on the bottom (black) string, crisscross the top (red) string through the last added bead. Continue to pass the black string (the one you just used to add new beads on) through the two beads from step 7 and 8. (marked with A
and B).
|
|
 |
|
Go to Page 2 to continue the Beaded Bon Bon Sweet Tutorial
|