|
|
Go back to page 1 of tutorial.
|

|
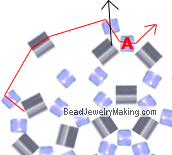
| Step 17: |
- Continue to:
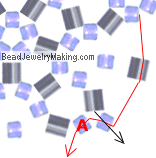
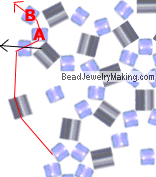
Add one seed bead, one bugle and one last seed bead on the bottom left (red) string, crisscross the top right (black) string through the last added bead. Continue to pass the red string (the one you just used to add new beads on) through the one bead from step 8. (marked with A).
|
|
 |
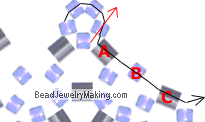
| Step 18: |
- Continue to:
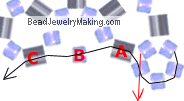
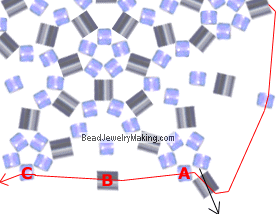
Add three seed beads on the left (black) string, crisscross the right (red) string through the last added bead. Continue to pass the black string (the one you just used to add new beads on) through the three beads from step 8, 9 and 10. (marked with A, B
and C).
|
|
|
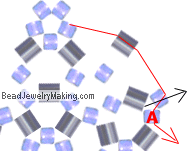
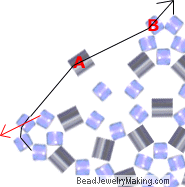
| Step 19: |
- Continue to:
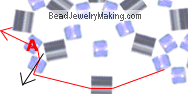
Add one bugle and one last seed bead on the top (red) string, crisscross the bottom (black) string through the last added bead. Continue to pass the red string (the one you just used to add new beads on) through one bead from step 10 (marked with A).
|
|
 |
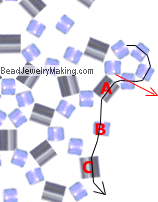
| Step 20: |
- Continue to:
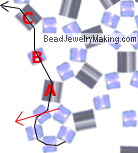
Add three seed beads on the top (black) string, crisscross the bottom (red) string through the last added bead. Continue to pass the black string (the one you just used to add new beads on) through the three beads from step 10, 11 and 12. (marked with A, B
and C).
|
|
 |
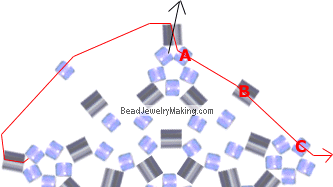
| Step 21: |
- Continue to:
Add one bugle and one last seed bead on the top (red) string, crisscross the bottom (black) string through the last added bead. Continue to pass the red string (the one you just used to add new beads on) through one bead from step 12 (marked with A).
|
|
 |
| Step 22: |
- Continue to:
Add three seed beads on the right (black) string, crisscross the left (red) string through the last added bead. Continue to pass the black string (the one you just used to add new beads on) through the three beads from step 12, 13 and 14. (marked with A, B
and C).
|
|
 |
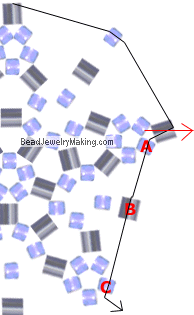
| Step 23: |
- Continue to:
Add one bugle and one last seed bead on the right (red) string, crisscross the left (black) string through the last added bead. Continue to pass the red string (the one you just used to add new beads on) through one bead from step 14 (marked with A).
|
|
 |
| Step 24: |
- Continue to:
Add three seed beads on the bottom right (black) string, crisscross the top left (red) string through the last added bead. Continue to pass the black string (the one you just used to add new beads on) through the three beads from step 14, 15 and 16. (marked with A, B
and C).
|
|
 |
| Step 25: |
- Continue to:
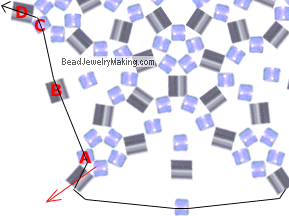
Add one bugle and one last seed bead on the bottom (red) string, crisscross the top (black) string through the last added bead. Continue to pass the red string (the one you just used to add new beads on) through two bead from step 16 and 17 (marked with A
and B).
|
|
 |
| Step 26: |
- Continue to:
Add two seed beads on the bottom (black) string, crisscross the top (red) string through the last added bead. Continue to pass the black string (the one you just used to add new beads on) through the two beads from step 17 and 18. (marked with A
and B).
|
|
 |
| Step 27: |
- Continue to:
Add one bugle, one seed bead and one last bugle on the left (red) string, crisscross the right (black) string through the last added bead. Continue to pass the red string (the one you just used to add new beads on) through three beads from step 18, 19 and 20 (marked with A, B
and C).
|
|
|
| Step 28: |
- Continue to:
Add one seed bead and one last bugle on the top (black) string, crisscross the bottom (red) string through the last added bead. Continue to pass the black string (the one you just used to add new beads on) through the three beads from step 20, 21 and 22. (marked with A, B
and C).
|
|
 |
| Step 29: |
- Continue to:
Add one seed bead and one last bugle on the top (red) string, crisscross the bottom (black) string through the last added bead. Continue to pass the red string (the one you just used to add new beads on) through three beads from step 22, 23 and 24 (marked with A, B
and C).
|
|
|
| Step 30: |
- Continue to:
Add one seed bead and one last bugle on the right (black) string, crisscross the left (red) string through the last added bead. Continue to pass the black string (the one you just used to add new beads on) through the four beads from step 24, 25, 26 and 27. (marked with A, B, C and D).
|
|
|
|
Go to Page 3 to continue the Beaded Bon Bon Sweet Tutorial
|