|
|
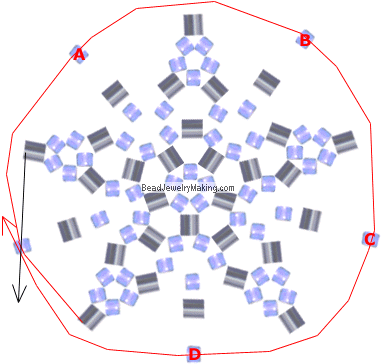
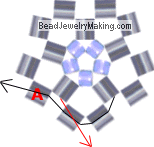
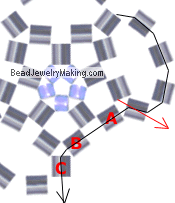
| Step 31: |
- Continue to:
Add one seed bead on the bottom (red) string, crisscross the top (black) string through the last added bead. Continue to pass the red string (the one you just used to add new beads on) through the four beads from step 27, 28, 29 and 30. (marked with A, B, C and D) and back up through the bead you just added.
- You should have a round beaded ball now. Do not cut away the excess threads as you will be continuing from here.
|
|
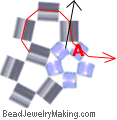
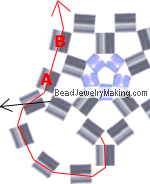
| Step 32: |
- Continue to:
Add four bugle beads on the bottom (black) string, crisscross the top (red) string through the last added bead. Continue to pass the black string (the one you just used to add new beads on) through the one bead from step 27. (marked with A).
|
|

|
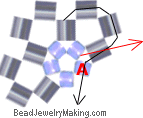
| Step 33: |
- Continue to:
Add three bugle beads on the left (red) string, crisscross the right (black) string through the last added bead. Continue to pass the red string (the one you just used to add new beads on) through one bead from step 28 (marked with A).
|
|
 |
| Step 34: |
- Continue to:
Add three bugle beads on the top (black) string, crisscross the bottom (red) string through the last added bead. Continue to pass the black string (the one you just used to add new beads on) through one bead from step 29. (marked with A).
|
|
 |
| Step 35: |
- Continue to:
Add three bugle beads on the right (red) string, crisscross the left (black) string through the last added bead. Continue to pass the red string (the one you just used to add new beads on) through one bead from step 30 (marked with A).
|
|
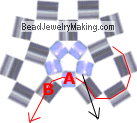 |
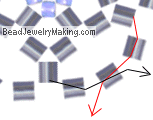
| Step 36: |
- Continue to:
Add three bugle beads on the right (black) string, crisscross the left (red) string through the last added bead. Continue to pass the black string (the one you just used to add new beads on) through the one bead from step 32. (marked with A).
|
|
 |
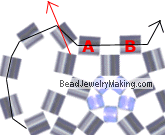
| Step 37: |
- Continue to:
Add five bugles on the right (red) string, crisscross the left (black) string through the last added bead. Continue to pass the red string (the one you just used to add new beads on) through two beads from step 32 and 33 (marked with A
and B).
|
|
 |
| Step 38: |
- Continue to:
Add four bugle beads on the bottom (black) string, crisscross the top (red) string through the last added bead. Continue to pass the black string (the one you just used to add new beads on) through the two beads from step 33 and 34. (marked with A and B).
|
|
 |
| Step 39: |
- Continue to:
Add four bugle beads on the left (red) string, crisscross the right (black) string through the last added bead. Continue to pass the red string (the one you just used to add new beads on) through two beads from step 34 and 35 (marked with A
and B).
|
|
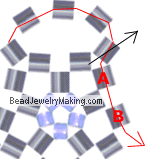 |
| Step 40: |
- Continue to:
Add four bugle beads on the top (black) string, crisscross the bottom (red) string through the last added bead. Continue to pass the black string (the one you just used to add new beads on) through the three beads from step 35, 36 and 37. (marked with A, B
and C).
|
|
 |
| Step 41: |
- Continue to:
Add one bugle on each side of the string and one last bugle to crisscross both strings through (shown where both arrows are coming out from).
|
|
 |
|
|
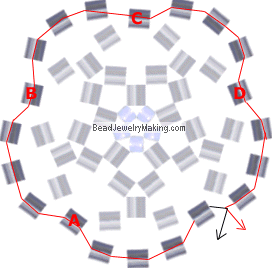
| Step 42: |
- Continue to:
Using the left (red) string, add three bugle beads, pass the same string through the bead marked A, add another three new bugle beads, pass the same string through the bead marked B, add another three new bugle beads, pass the same string through the bead marked C, add another three new bugle beads, pass the same string through the bead marked D, Add another three new bugle beads, tie off.
- Repeat step 32 to step 42 for the opposite side of the beaded sweet.
- Add on a hook or clasps to hang as a charm on your bag or phone.
|
|